Basic Sensor Plots with Arduino
Learn how to use Arduino/ESP32 with the Aicuflow library to create plots on a connected SPI TFT Display.
This tutorial focuses on the ESP-32 T-Display S3 with Arduino IDE, because it can be connected to the Internet easily and has a large display - great for debugging purposes.
Development Setup
- Set up your IDE and Aicuflow Microcontroller Library (see library details)
- Install and set up the
TFT_eSPIlibrary for your board by changingUser_Setup_Select.hin the libraries folder. - Connect your Microcontroller to your computer / laptop and flash the device with the code below.
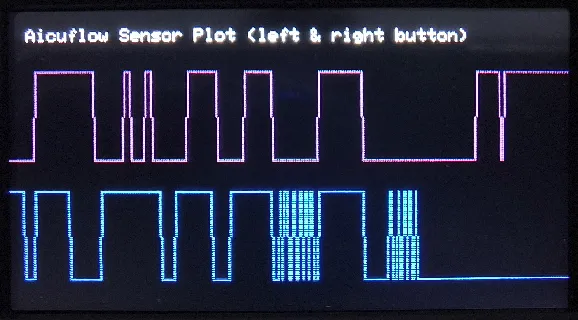
Example code
Copy the following definitions and functions into your Arduino IDE and upload to device:
/**
 *  Aicuflow AI Flow Builder + Arduino ESP32 Quickstart
 *  Created: 20260122, by Finn Glas @ AICU GmbH
 *  Simple sensor graphing example.
 *  Uses ESPI v2.5.43 Bodmer, which needs customisation.
 *  Check https://aicuflow.com/docs/library/arduino for more!
 */

#include <TFT_eSPI.h>
#include "SensorMeasurement.h"

bool isTDisplayS3 = true;
int leftButton = 0;
int rightButton = isTDisplayS3 ? 14 : 35;

TFT_eSPI tft = TFT_eSPI();
SensorMeasurement sensors("dev");
void setup() {
tft.init();
tft.fillScreen(TFT_BLACK);
tft.setRotation(1);
tft.setCursor(10, 10);
tft.println("Aicuflow Sensor Plot (left & right button)");
pinMode(leftButton, INPUT_PULLUP);
sensors.registerSensor("left_button", "Button L", [&]() { return digitalRead(leftButton) == 0 ? 1.0 : 0.0; }, 0, 1, TFT_PURPLE, LOG_SEND, SHOW_GRAPH);
pinMode(rightButton, INPUT);
sensors.registerSensor("right_button", "Button R", [&]() { return digitalRead(rightButton) == 0 ? 1.0 : 0.0; }, 0, 1, TFT_BLUE, LOG_SEND, SHOW_GRAPH);
sensors.setGraphSpacing(tft.height()/2-2*tft.height()/10, tft.height()/10);
sensors.initGraphs(&tft, tft.width(), tft.height());
}
void loop() {
delay(100);
sensors.measure();
sensors.updateGraphs();
}You can add other sensors (like the internal voltage detection) and change the Sketch parameters. Go ahead!
Arduino Beginner Tutorial
This is a beginner tutorial. It takes about 2 minutes to read and 10 minutes to understand. Get ahead quickly with learning arduino from scratch. After this, you are ready to start connecting Microcontrollers to Aicuflow.
AI Predictions with Arduino
Learn how to integrate Arduino/ESP32 with Aicuflow to train AI models based on real world sensor data. This is a basic example you can follow. The use case be expanded to collect sensor data from large amounts of devices with peripheral sensor / actor devices like SPS.